Spoofing DNS Records by Abusing DHCP DNS Dynamic Updates

Executive summary
Akamai researchers discovered a new set of attacks against Active Directory domains that use Microsoft Dynamic Host Configuration Protocol (DHCP) servers.
These attacks could allow attackers to spoof sensitive DNS records, resulting in varying consequences from credential theft to full Active Directory domain compromise. The attacks don't require any credentials, and work with the default configuration of Microsoft DHCP server.
The number of impacted organizations can be significant. Microsoft DHCP server is very popular; it was observed running in 40% of the networks monitored by Akamai.
We reported our findings to Microsoft, but a fix is not planned.
In this blog post, we detail the best practices for configuring Microsoft DHCP server in a way that mitigates these attacks, and share a tool meant to be used by system administrators and blue teams to detect risky configurations.
In a future blog post, we will share technical details about the implementation of these attacks from an attacker’s point of view.
Introduction
The ability to spoof DNS records is very appealing to attackers, as it can lead to devastating consequences, including sensitive data exposure, credential compromise, and even remote code execution.
In this blog post, we examine an attack surface in DNS that has been rarely researched, and is exposed by a seemingly harmless DHCP feature. By using it, we found several different ways that attackers could spoof DNS records on Microsoft DNS servers, including an unauthenticated arbitrary DNS record overwrite.
Alongside the attack flows, we also describe in detail the inner workings of a Microsoft DHCP server, its interaction with DNS and Active Directory, and how to properly secure these interfaces. Although many scattered (and inaccurate!) resources on DHCP exist online, we believe this blog post to be an accurate, comprehensive resource on the subject where all the critical information for defenders is presented in one place.
DNS and Active Directory
Our journey begins with Active Directory (AD). AD heavily relies on DNS for its operation. Every domain needs a DNS server that hosts a special DNS zone called Active Directory Integrated DNS (ADIDNS) zone (Figure 1). This zone is used to host DNS records for all domain-joined machines and the different services in AD.
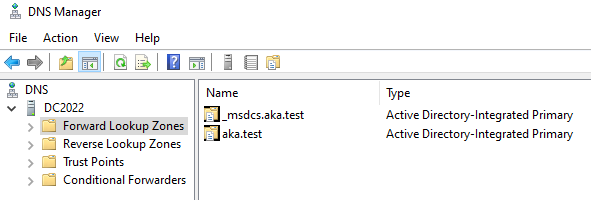 Fig. 1: The default ADIDNS
Records in ADI zones are managed using a DNS feature called Dynamic Updates. This feature allows each client to be responsible for its own record — when they need to create or modify their DNS record, they send a special DNS request that includes the data that needs to be modified on the server (Figure 2). When the DNS server receives this request, it modifies the client’s records accordingly.
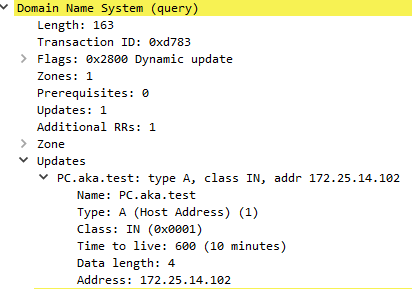 Fig. 2: An example of a DNS update’s content
One of the important features of DNS Dynamic Updates is Secure Updates, which is designed to control who can modify each DNS record in the zone. Without secure updates, the DNS server blindly obeys any update request, which allows attackers to easily overwrite existing records. With this feature, only secure updates are accepted by the DNS server for ADI zones by default (Figure 3).
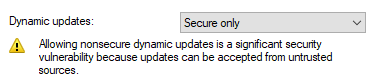 Fig. 3: DNS Dynamic Updates default settings
When Secure Updates are used, all update requests received by the server are authenticated and authorized — in ADI zones, this is performed using Kerberos. When an update is sent to the server, it includes a Kerberos ticket that is used to authenticate the user (Figure 4). For more information on the Kerberos authentication process over DNS, refer to Dirk-Jan Mollema’s research on relaying Kerberos over DNS.
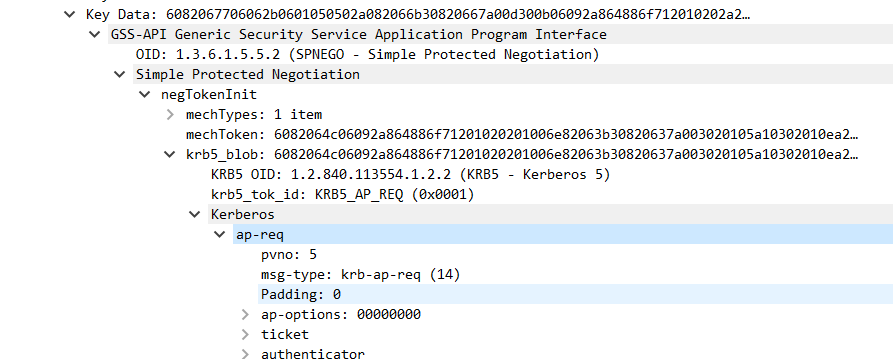 Fig. 4: A Kerberos ticket inside a DNS update
Each DNS record is protected by an access control list (ACL) that determines the access rights for each principal. These access rights are determined when the record is initially created: When a client creates a DNS record by sending a DNS Dynamic Update, the account of the machine that created the DNS record is automatically assigned as the record’s owner, and is given permissions over it. Normally, every DNS client uses its own machine account ticket to perform DNS updates. To authorize an update request, the DNS server verifies the record’s ACL against the authenticated principal.
In Figure 5, we can see the ACL for the DNS record of the host “PC.aka.test”. This record was created by the computer account, so it has permissions to modify it.
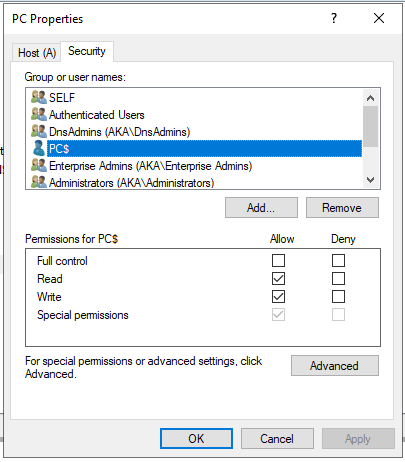 Fig. 5: Default DNS record ACL
Other principals (except some built-in strong groups) shouldn’t have permissions over the record. When a different principal attempts to modify a DNS record that they don’t own or have permissions over, the server refuses the update.
ADIDNS zones can be very interesting for attackers. Previous research by Kevin Robertson of NETSPI highlighted some interesting attacks on these DNS zones. We wanted to expand on this attack surface, so we began digging into additional related features, which led us to an interesting one — DHCP DNS Dynamic Updates.
DHCP DNS Dynamic Updates
DHCP is a network management protocol used to automatically assign IP addresses and other network options to clients. When a client joins a new network they will try to reach a DHCP server by sending a broadcast message, requesting network configurations. When a DHCP server receives this request, it will respond to the client with an assigned IP address.
DHCP is a very common protocol that is used in most corporate networks, and the Microsoft DHCP server, in particular, is a very popular option — we saw the Microsoft DHCP server running on 40% of the data center networks we monitor.
Although modern Windows clients (Windows 2000 and above) normally create their own records by sending DNS Dynamic Updates, this is not always the case. DNS records can also be created using a DHCP feature called DHCP DNS Dynamic Updates. The purpose of this feature is to allow a DHCP server to register DNS records on behalf of its clients. Whenever a client is given an IP address by the DHCP server, the latter can contact the DNS server and update the client’s DNS record. To perform these updates, the DHCP server uses (surprise, surprise!) DNS Dynamic Updates.
The name similarity can be quite confusing, so let's clarify:
Feature |
Protocol |
Purpose |
|---|---|---|
DNS Dynamic Updates |
DNS |
Allow DNS clients to create or modify DNS records on the DNS server |
DHCP DNS Dynamic Updates |
DHCP |
Allow the DHCP server to create or modify DNS records on behalf of its clients — the updates are performed using DNS Dynamic Updates |
The DHCP DNS Dynamic Update process is shown in Figure 6.
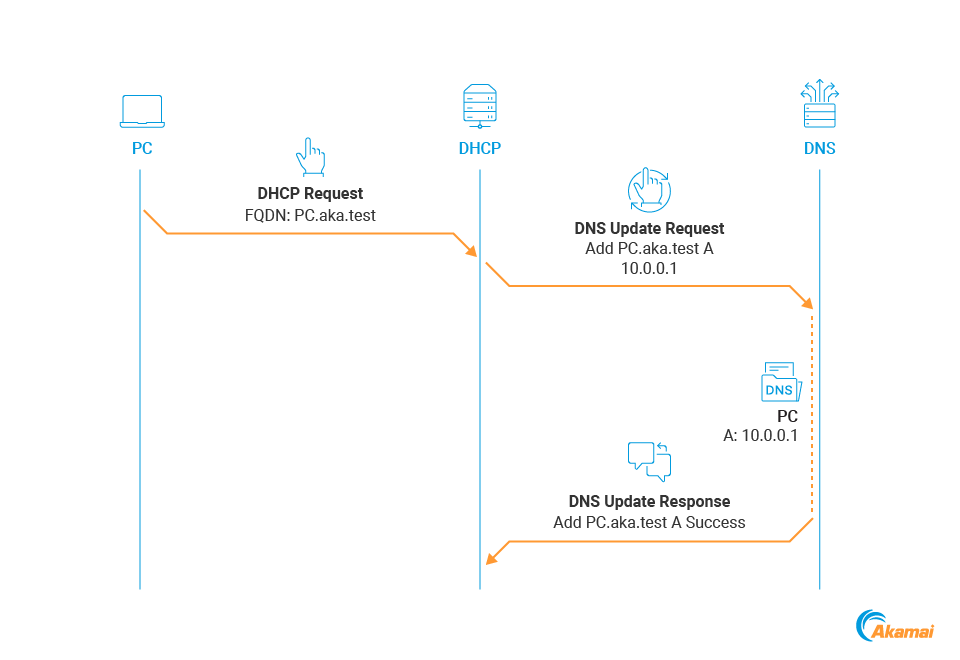 Fig. 6: DHCP DNS Dynamic Update process
The DHCP client gets an IP address from the DHCP server and informs it of its FQDN.
The DHCP server sends a Dynamic Update request to the DNS server.
The DNS server validates the request, creates a relevant record, and informs the DHCP server of the result in a Dynamic Update response.
Note that even when the DHCP DNS Dynamic Updates feature is enabled, the default configuration requires that the client explicitly specifies that a DNS record should be created on their behalf (Figure 7).
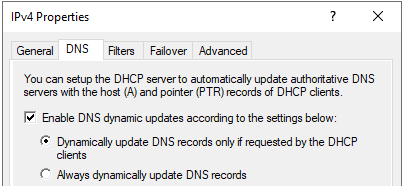 Fig. 7: DHCP DNS Dynamic Updates default configuration
To specify this, the client needs to send a dedicated DHCP option. DHCP options (Figure 8) are additional fields that can be added to a DHCP packet, and are used by the client and server to exchange information.
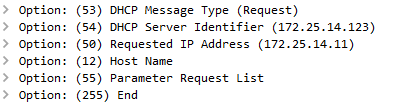 Fig. 8: An example of DHCP options
For our cause, the client sends the FQDN option, specified in RFC 4702. This option allows the DHCP client to inform the server of its fully qualified domain name (FQDN) and specify whether it should register a DNS record on behalf of the client. To do this, the client can use the Server Flag, which is part of the FQDN option. Setting it to 1 tells the server that it should create a record based on the provided FQDN (Figure 9).
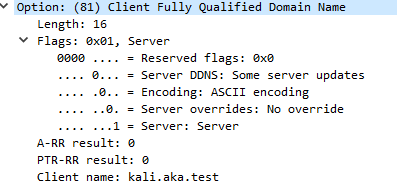 Fig. 9: DHCP request with the FQDN option
After receiving this request, the DHCP server sends a DNS Dynamic Update and creates the requested record (Figure 10).
 Fig. 10: ADI DNS zone with our new record
This feature is useful but is not commonly used today (as stated, most modern Windows clients simply create their own records). Despite that, Microsoft DHCP servers have this feature enabled by default, meaning the DHCP server will register a DNS record for any client that requests it.
Note that DHCP DNS Dynamic Updates require no authentication by the DHCP client — anyone in the network can lease an IP from a DHCP server, so an attacker can essentially use the DHCP server to authenticate to the DNS server on behalf of themself. This grants the attacker access to the ADIDNS zone without any credentials.
Microsoft seems to be aware of the potential risks that this feature poses and acknowledges some of them, but this attack surface is still mostly unknown to attackers and defenders
The following sections detail the attacks that could be performed by abusing DHCP DNS Dynamic Updates.
DHCP DNS spoofing
Previously described ADIDNS spoofing attacks weaponized ADIDNS to improve the classic LLMNR/NBNS spoofing attack. After identifying unsuccessful name resolution attempts (“dead hosts”), an attacker would register the name in the ADI zone, making future name resolution attempts point to the attacker’s machine.
This attack could be very impactful, but it had one major prerequisite — valid domain credentials. By using the DHCP server we can bypass this requirement and operate without any credentials. We can simply send a DHCP DNS Dynamic Update for any FQDN that doesn’t exist in the ADI zone, and the DHCP server will create it for us. We’re calling this variation of the attack DHCP DNS spoofing. This technique was also covered in a blog post by Hans Lakhan of TrustedSec.
What DNS names could we use for this attack? Again drawing from Robertson’s research, some obvious candidates would not work.
The notorious WPAD hostname would be blocked by the global query block list (GQBL) on the DNS server.
The wildcard record (“*”) can’t be created via dynamic DNS updates, so cannot be abused in this scenario.
Without these two candidates, we are left with the option of identifying dead hosts that are specific to the network. We can identify them by sniffing the network for name resolution broadcasts over Link-Local Multicast Name Resolution (LLMNR) or NetBIOS Name Service (NBT-NS). After we identify a potential dead host, we can create a matching DNS record by sending a DHCP DNS Dynamic Update (Figure 11).
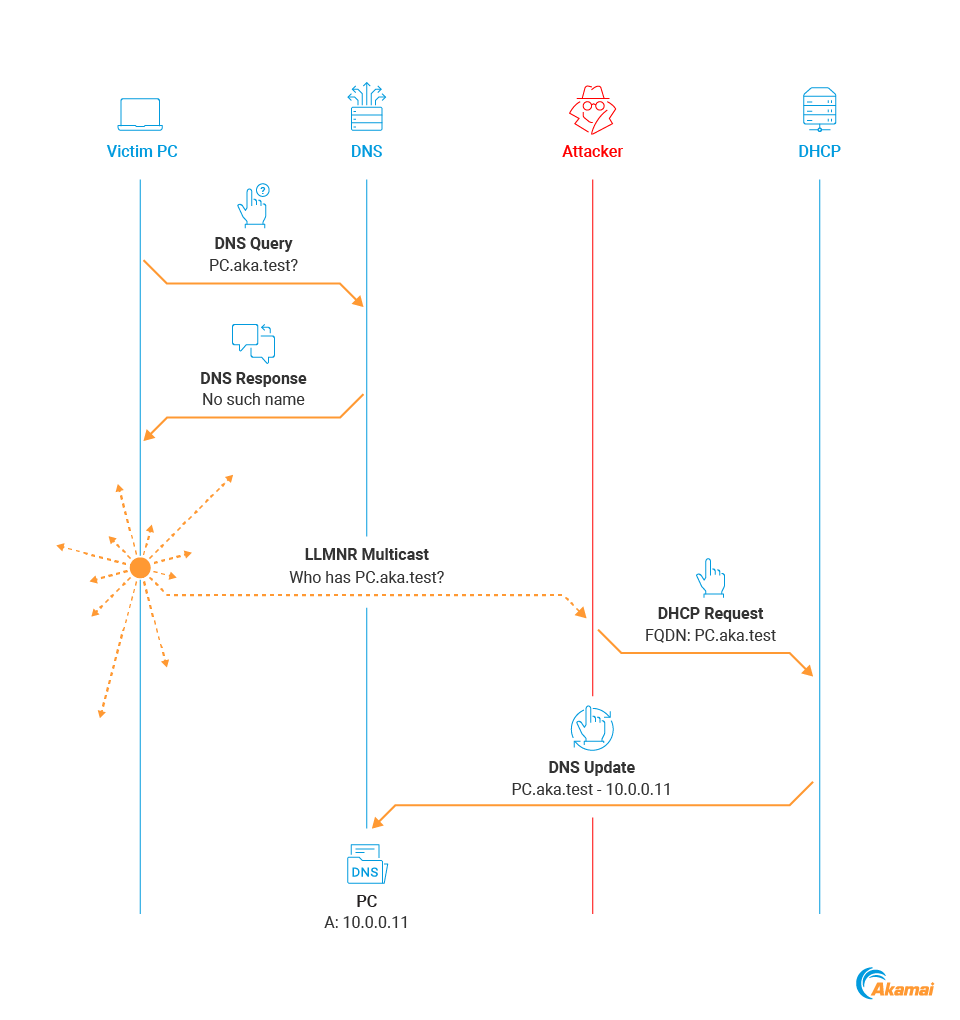 Fig. 11: Using DHCP DNS Dynamic Update to spoof dead hostnames
A host in the network attempts to resolve the name “PC.aka.test”, and sends the DNS server a query.
“PC.aka.test” is unknown to the DNS server, so it responds with “No such name”.
The host then sends an LLMNR multicast to try and locate the “PC.aka.test” in its LAN.
The attacker identifies this attempt and requests an IP lease from the DHCP server with “PC.aka.test” as the FQDN.
The server sends a Dynamic Update request to the DNS server and the record is created.
Now, the next time that any host in the network tries to resolve “PC.aka.test”, they will be redirected to the attacker. All the attacker has to do now is to fire up ntlmrelayx.py and wait for authentication attempts.
This approach is better than both the standard LLMNR/NBNS spoofing method and the ADIDNS spoofing variation.
Classic LLMNR/NBNS spoofing requires no authentication, but is limited to victims in the same LAN (as LLMNR/NBNS are broadcast-based).
ADIDNS spoofing allowed us to target victims outside the LAN (as DNS works across subnets), but required an authenticated user.
With DHCP DNS Dynamic Updates we get the best of both worlds — the attack works on victims outside the LAN, and doesn’t require any authentication.
This is pretty cool, but we can do even better.
Overwriting existing records
Creating nonexisting DNS records is cool, but this led us to think about another option: What happens if we try to create a record for a hostname that already exists? Could we possibly overwrite them somehow? Ideally, it shouldn’t be possible — right? Well…
We identified cases where it could be possible for unauthenticated attackers to overwrite existing records. We’re calling this technique DHCP DNS overwrite. Before we get into those cases, let's discuss some more details about the DHCP Dynamic Updates process.
DNS record types and their owners
In the context of DHCP DNS attacks, there's an important distinction to make between two types of DNS records (Figure 12). We will use the following terms from now on:
Client records: Records that were created by Windows clients directly
Managed records: Records that were created by the DHCP server on behalf of clients
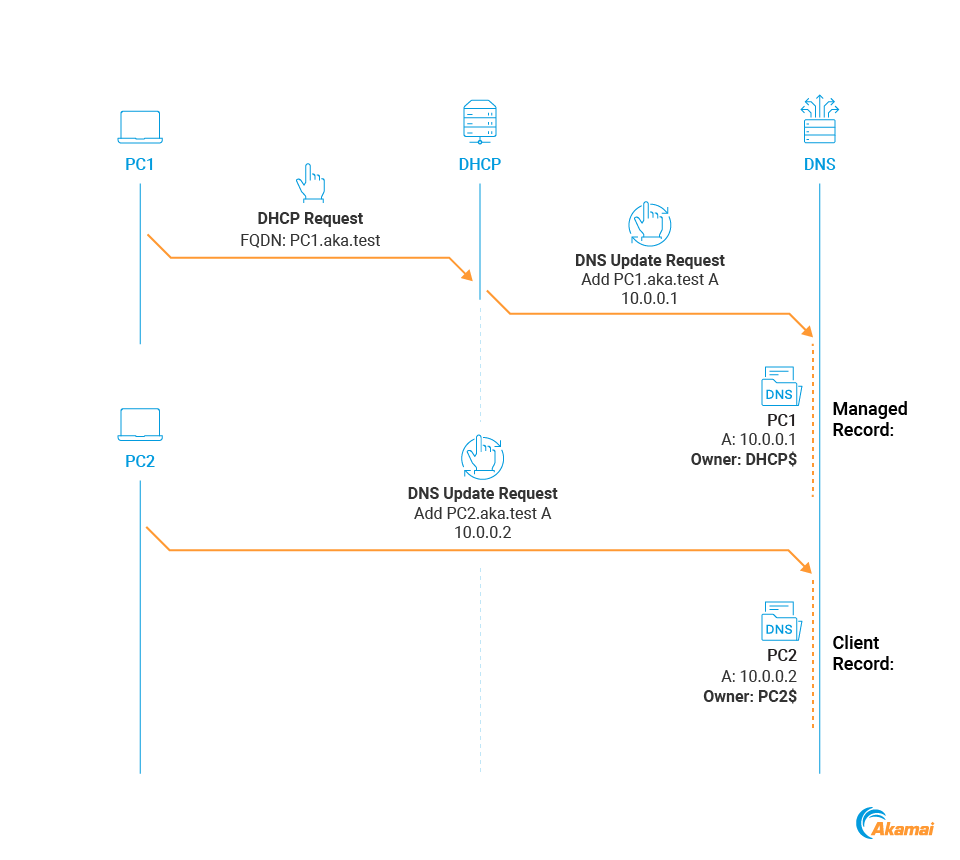 Fig. 12: DNS record types
The crucial difference between these clients is their owner. As we described earlier in this post, when a DNS update is performed, a client record is created, and the principal that sent the update request is assigned as the record owner. For normal Windows clients, this principal is the machine account of the client.
One might expect that managed records would also be owned by their requesting client, but this is not the case. When the DHCP server sends DNS updates on behalf of clients, it also authenticates using its own machine account — which becomes the record owner.
We can see this difference in Figure 12. PC2 is a client record owned by the client, and PC1 is a managed record owned by the DHCP server.
Access control lists limit DHCP DNS overwrites
When we try to perform a DHCP DNS Dynamic Update on an existing record — in this case, the “PC.aka.test” record — we fail. An interesting behavior is observed: The DHCP server actually does send a DNS update with our supplied FQDN, but the update is then refused by the server (Figure 13).
 Fig. 13: DHCP DNS update refused by the server
This happens because the DHCP server is not authorized to modify the record.
PC.aka.test is a client record, which is owned by the PC$ principal. When the DHCP server sends the DNS update, it authenticates by using its own machine account — DHCP$. Since this account doesn’t have permissions over the record, the update is refused (Figure 14).
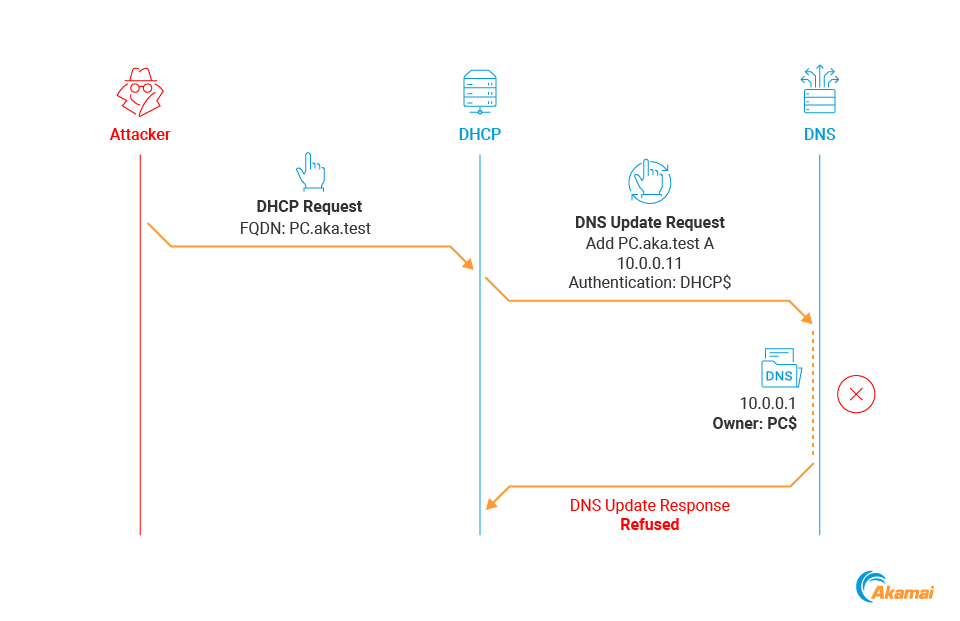 Fig. 14: DNS record overwrite fails
To summarize: It is possible for attackers to use the DHCP server to send arbitrary DNS updates, but the DNS records should be safe from overwrites because of their ACLs.
Now that we understand the mechanism that’s supposed to prevent overwrites, let's see how they could still be performed.
Managed record overwrite
Although overwrites of existing client records don’t work because of their restricting ACLs, overwrites of managed records (ones created by DHCP) do work, as the authenticating machine is also the record owner (Figure 15).
This is possible because a DHCP server doesn’t verify DNS record ownership and sends a DNS update for any requested FQDN.
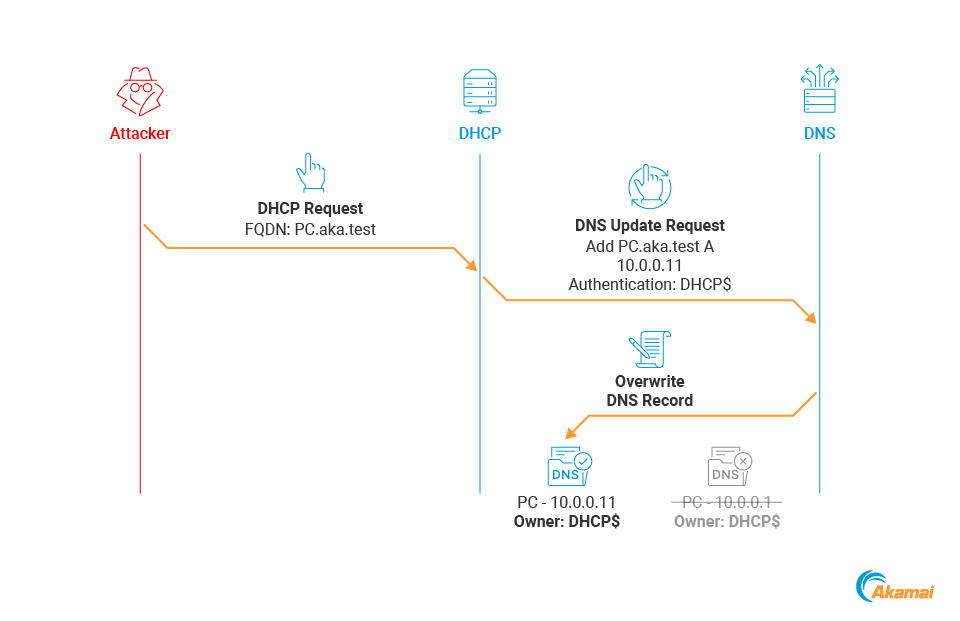 Fig. 15: DHCP DNS overwrite of records owned by the DHCP server
As we can see, the DHCP server performs an update using the same account that owns the record — its own — and so the update succeeds.
Let's look at an example. We boot an Ubuntu server, which is not part of the domain and therefore cannot register its own DNS record. Instead, it asks the DHCP server to do it on its behalf (Figure 16).
 Fig. 16: DHCP server registers a DNS record on behalf of the Ubuntu server
This record is owned by the DHCP server machine account. Now, from our attacking machine we request the same FQDN from the DHCP server in the lease process. We check the DNS zone and see that our overwrite was successful, and the record now points to the IP that was just leased to us (Figure 17).
 Fig. 17: Overwritten Ubuntu server DNS record
This attack is okay, but its impact is pretty limited as it only affects managed records. As we’ve mentioned before, these records are much less common than client records, which are not affected by this attack. Despite that, managed records can still be found in some cases in which the client is unable to register their own record, such as:
Non-Windows clients
Legacy Windows clients
Windows clients that disabled client DNS updates
DHCP self-overwrite
To increase the potential impact, we want to be able to overwrite records that are present in any ADI zone — client records. The problem is that these records are owned by the machines that created them, and we can only authenticate using the DHCP server’s machine account.
But what about the DNS record of the DHCP server? When the DHCP server creates its own DNS record, its machine account becomes the record owner! It turns out that we can make the DHCP server perform DHCP DNS overwrite on itself. If we supply the DHCP server name as our FQDN, the DHCP server will send a DNS update for its own client record — and this overwrite would succeed!
 Figure 18 shows this attack flow.
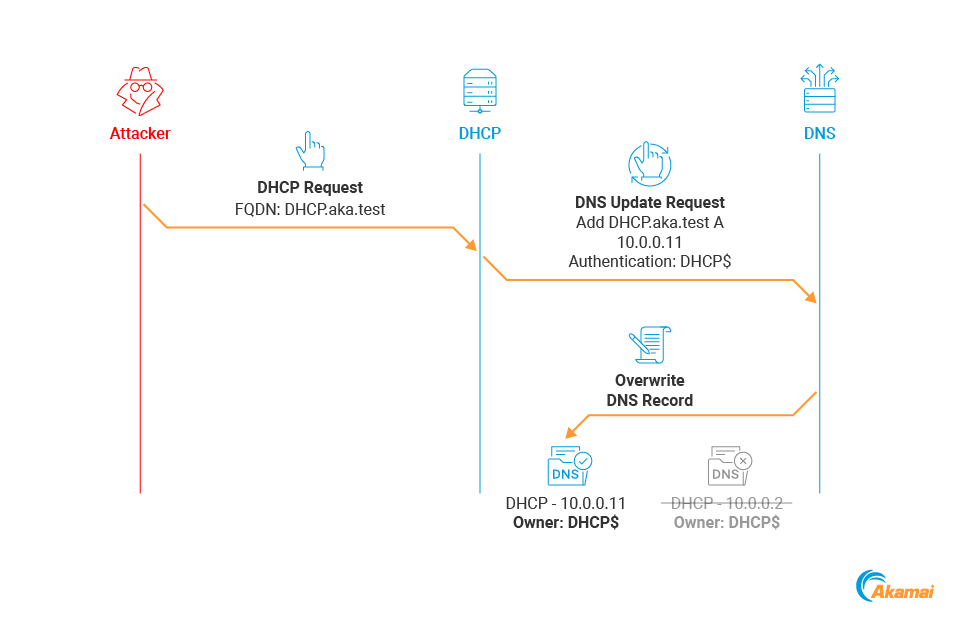 Fig. 18: DHCP DNS overwrite of the DHCP server DNS record
This attack is more reliable: If a Microsoft DHCP server is present in the network, a matching client record for it is guaranteed, whereas managed records (that are needed for the previous overwrite scenario) are more rare.
As for the impact, attackers would be able to intercept any communication destined for the DHCP server. The severity would depend on the nature of this traffic. In most cases, the ability to intercept communication destined for the DHCP server could be abused to intercept credentials and relay them, or capture sensitive traffic of other services that might be installed on the server.
Speaking of sensitive services: What if the DHCP server is installed on a domain controller (DC)? Can we overwrite the DC record? Well, it turns out we can.
DHCP DC arbitrary overwrite
If the DHCP server is installed on a DC, we can perform a DHCP DNS overwrite on the DC’s own record (because of the reasons we described earlier in this post). That can be very useful, but there’s more we can do.
As we already know, if the DHCP server is installed on a DC, the DC’s machine account will be used when sending DNS updates. Interestingly, if we inspect the default ACL of an arbitrary DNS record, we will see that the ENTERPRISE DOMAIN CONTROLLERS principal has write permission over every DNS record in the zone — regardless of who created it (Figure 19).
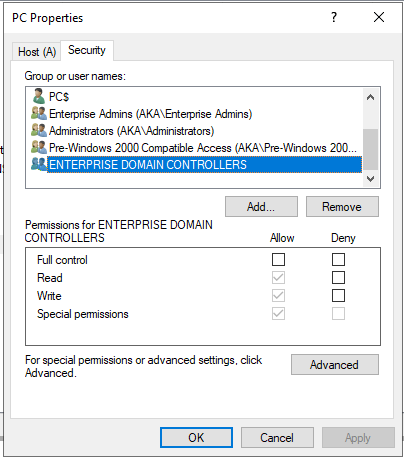 Fig. 19: Default ACL of all domain records containing the ENTERPRISE DOMAIN CONTROLLERS group
This is huge. If the DHCP server is a DC, then it has permissions over all the records in the zone, and attackers could use it to overwrite any DNS A record inside the ADI zone — as an unauthenticated user! The attack is illustrated in Figure 20.
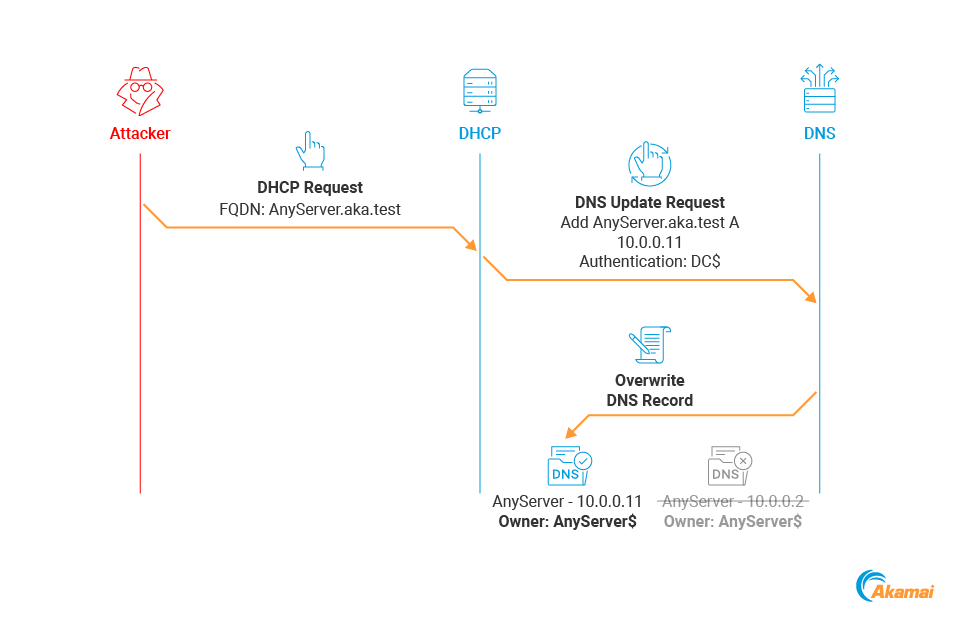 Fig. 20: Arbitrary DHCP DNS overwrite when the DHCP server is a DC
Our data shows that this risky configuration is pretty common — among the networks that we observed using Microsoft DHCP server, 57% have a DHCP server installed on a DC. All these domains are vulnerable by default.
Although this risk was acknowledged by Microsoft in their documentation, we believe that the awareness of this misconfiguration is not in accordance with its potential impact.
Mitigations for DHCP DNS attacks and how they can be bypassed
All the attacks described until now work with Microsoft DHCP servers’ default configuration. However, there are two settings that could help mitigate some of them. Let’s take a look at them, and see how they too can be bypassed.
DHCP Name Protection
As we know, when a DHCP server creates a DNS record there's nothing stopping other clients from requesting the same FQDN and forcing the server to overwrite it. Name Protection is a feature that's meant to prevent this from happening.
Name Protection is implemented using a special DNS record type — DHCID (DHCP client identifier). With Name Protection enabled, every time a DHCP server registers a record on behalf of a client, an additional DHCID record is created (Figure 21).
 Fig. 21: DHCID record created by a DHCP server with Name Protection enabled
As you can see, the DHCID record value is a chunk of data encoded in Base64. This value (which we will analyze later in this post) is a unique signature meant to identify the DHCP client that requested the record creation or update.
When the DHCP server is requested to modify a DNS record, it calculates the client’s DHCID value and sends a DNS update that includes the updated data alongside that DHCID value.
If the record doesn't already exist on the DNS server, it simply creates the record and the matching DHCID record. However, if the Host (A) and DHCID records exist, the existing DHCID value is compared with the one sent by the DHCP server. The update is performed only if the values match.
So, essentially, the DHCID record associates a DNS record with the client that created it. After this association is created, only this original client will be able to perform modifications to the record.
Bypassing Name Protection
We found a way to bypass Name Protection by using a DHCP Release message — a message sent by DHCP clients to inform the server when they no longer need their leased IP address. To keep track of the addresses that it leased, the DHCP server maintains a table that stores the different addresses, their expiration times, and the unique identifier of the client who leased them (Figure 22).
 Fig. 22: DHCP server lease table entry
The unique identifier is simply the client’s MAC address. When receiving a Release message from a client, the DHCP server looks up an existing entry with a matching address and ID, and deletes it if it's found. When DHCP DNS Dynamic Updates are enabled, in addition to freeing the IP address, the DHCP server will also send a DNS Dynamic Update to delete the associated DNS record of the client.
If we can send a DHCP Release with a unique ID (MAC address) that matches our target’s ID, the DHCP server will delete the record, enabling us to register it for ourselves — the only requirement to bypass Name Protection is the victim’s MAC address! (Note that there's no need to change our actual MAC — the value is taken from the DHCP header.)
If we’re on the same LAN as the target, finding its MAC is pretty trivial; for example, we can find it by sending an ARP request. But what if we’re not on the same LAN? We have another option.
Brute forcing DHCID records to bypass Name Protection
DHCID records are defined in RFC 4701, and their algorithm is pretty simple:
Concatenate the following values:
DHCP HTYPE (hardware type). For Ethernet, the value is 01.
DHCP Client ID option
Record FQDN (in DNS wire format)
SHA256 the result
Add DHCID data bits (in the Windows implementation, this value is constant)
Encode the result in Base64
Figure 23 shows a DHCID calculation example.
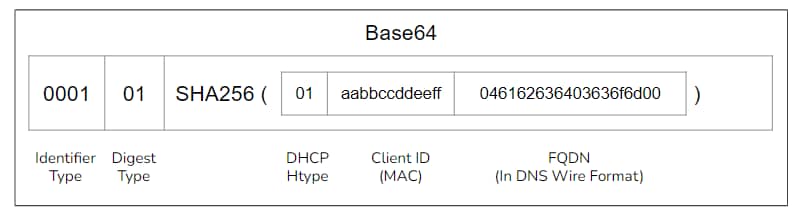 Fig. 23: A DHCID calculation example
Since we know the FQDN and the data bits are constant, the only variable is the client ID — which is again the client’s MAC address.
DHCID records are normal DNS records, so any client can query the DNS server for their value. Because we know the algorithm to calculate a DHCID record, we can iterate all possible MAC addresses and compute their DHCID value and compare each result with our target record. When we get a match, we know we have found the correct MAC address. This allows attackers to brute force the MAC address in reasonable time — 248 possible MAC addresses could be cracked by a modern, dedicated computer in just a few days. We can reduce this time drastically if we only use common vendor IDs. An example of this process can be seen in Figure 24.
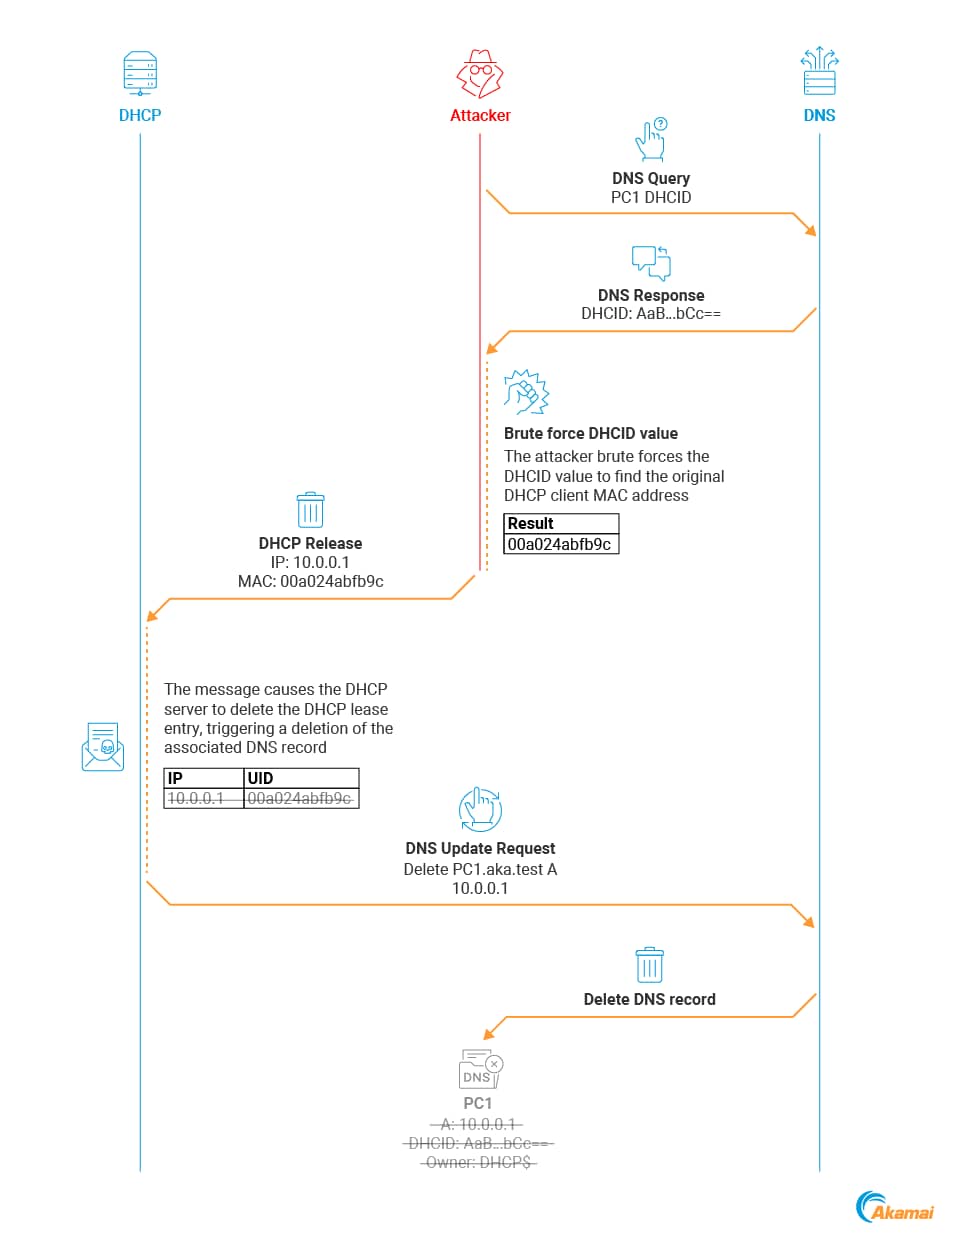 Fig. 24: Deleting a DNS record protected by Name Protection
The referenced code can be used to calculate the DHCID value based on specified parameters.
The side-effect mitigations of Name Protection
DHCP Name Protection is meant for managed records: Essentially, the DHCP server protects records that were created by it from being modified by random clients. Name Protection doesn't have anything to do with client records.
Despite that, in some cases, Name Protection can still mitigate attacks on client records.
When updating DNS records with Name Protection enabled, the DHCP server requires the presence of a DHCID record. Since normal DNS clients don't create DHCID records, client records are not accompanied by them. As a result, any attempt to update a client record from a DHCP server would fail (Figure 25).
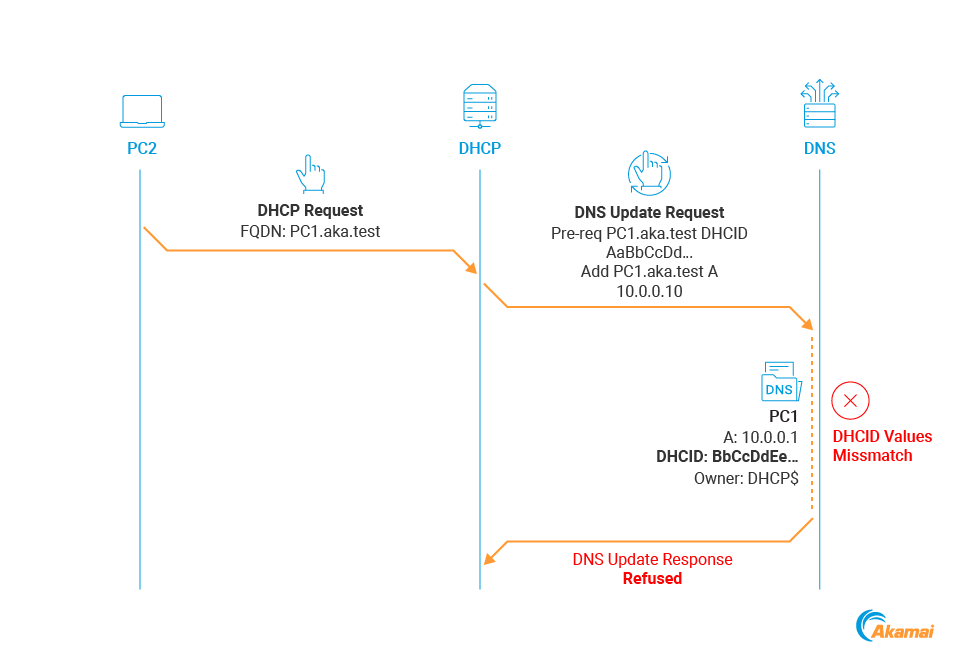 Fig. 25: DNS update failing when a DHCID record doesn't exist
This happens because of the way Name Protection is implemented. When a DHCP server with Name Protection enabled sends a DNS update, it adds a Prerequisites field to the request. This field specifies conditions that have to be met on the DNS server for the DNS update to take place. In Figure 26, we can see that the DNS update sent by the DHCP server includes a prerequisite for the DHCID value.
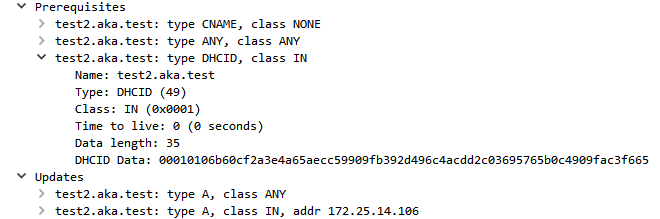 Fig. 26: DNS update prerequisites
This means that the update would fail if a matching value doesn't exist. Since client records should never have a DHCID record, if Name Protection is enabled the client records should be protected from DHCP DNS overwrites without a way to bypass it. Should be.
This is not really part of the Name Protection feature — more a byproduct of it — as, by definition, Name Protection is meant to protect only managed records. Still, because of the logic we just described, it may also protect client records. But even this accidental defense can be bypassed.
DHCP scopes to the rescue?
DHCP servers support the ability to define multiple scopes — a scope is a defined set of IP addresses in a specific subnet that the DHCP can lease (Figure 27).
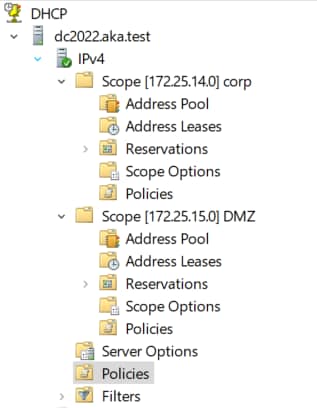 Fig. 27: An example of DHCP scopes
The separation into scopes allows a better management of address distribution, and also allows the application of different policies for different subnets. Name Protection is one of these policies, and it is enabled on the scope level, meaning that different scopes can have different configurations.
As we mentioned earlier in this post, when we tried to perform a DHCP DNS overwrite on a client record, we failed because our lease was from a DHCP scope with Name Protection. But there's an important thing to understand: Scope is a DHCP term. Client records are not aware of them and are not associated with any scope.
Because of that, if we can get a lease from another scope that has Name Protection disabled, we can “bypass” this mitigation. (How to get a lease from another scope that has Name Protection disabled is beyond the breadth of this post, but you can check out the DHCP relay option)
This means that even if a single scope on the server has Name Protection disabled, it should be enough for an attacker to overwrite client records (given one of the misconfigurations discussed earlier).
DNS credential
Another setting that could be configured on the DHCP server is DNS credential. This setting allows us to supply a domain user’s credential, and have it used by the DHCP server instead of the machine account when creating and updating records (Figure 28).
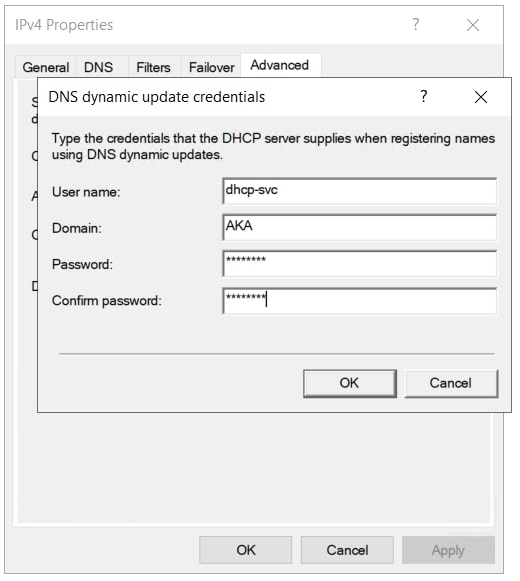 Fig. 28: DHCP DNS credential configuration
Let's go back to the example in which a DHCP server was installed on a DC. Upon updating DNS records, the DC machine account was used, an account that has permissions over any record in the zone. With a DNS credential configured, a weak account could be used instead, and the attack would no longer work.
Configuring a DNS credential is very important, as it allows a reduction of the attack surface that the DHCP server exposes. It should be able to mitigate the most severe attacks we described earlier.
However, there are two details you need to consider when using this feature:
The configured credential has to be a weak user. If we configure it as a domain admin, for example, the DHCP server would still be able to overwrite arbitrary records.
DNS records created by the DHCP server would still be owned by the same credential, and would still be vulnerable to DHCP DNS overwrite.
DNSUpdateProxy group
During our investigation of Microsoft’s DHCP and its interaction with DNS, we found another feature that can be abused — the DNSUpdateProxy group. This group is meant to solve two permission-related problems of managed Records: the upgraded client problem and the multiple DHCP server problem.
Upgraded client problem
Let’s consider the upgraded client problem first: A legacy client initially uses the DHCP server to register a DNS record, but is then upgraded to a newer OS that supports DNS Dynamic Updates. The client cannot modify its record directly, as the record is owned by the DHCP server that created it.
To solve this problem, the DHCP server can be added to the DNSUpdateProxy group.
This group has two effects: First, when its members create a DNS record, the record’s ACL is different from normal managed records — the Authenticated Users group is given write permission over the record. This means that any client in the domain can modify it (Figure 29).
 Fig. 29: DNSUpdateProxy record ACL
The second effect is a “record takeover” feature — the first client that modifies a record that was created by a DNSUpdateProxy member is granted ownership over it, and removes the authenticated users’ write permission. This solves the upgraded client problem by allowing clients to modify and take over their own record once they are required to do so.
Multiple DHCP server problem
The second problem arises when multiple DHCP servers are required to work together. In this example we have two DHCP servers — DHCP1 and DHCP2, and a client PC1 registers a DNS record through DHCP1.
Now, let's imagine that DHCP1 goes offline for some reason, and DHCP2 is brought into action. The client’s lease expires, so it contacts DHCP2 for a new one. When DHCP2 leases the new IP and tries to modify the DNS record for the client, it fails — because the record is owned by DHCP1 (Figure 30).
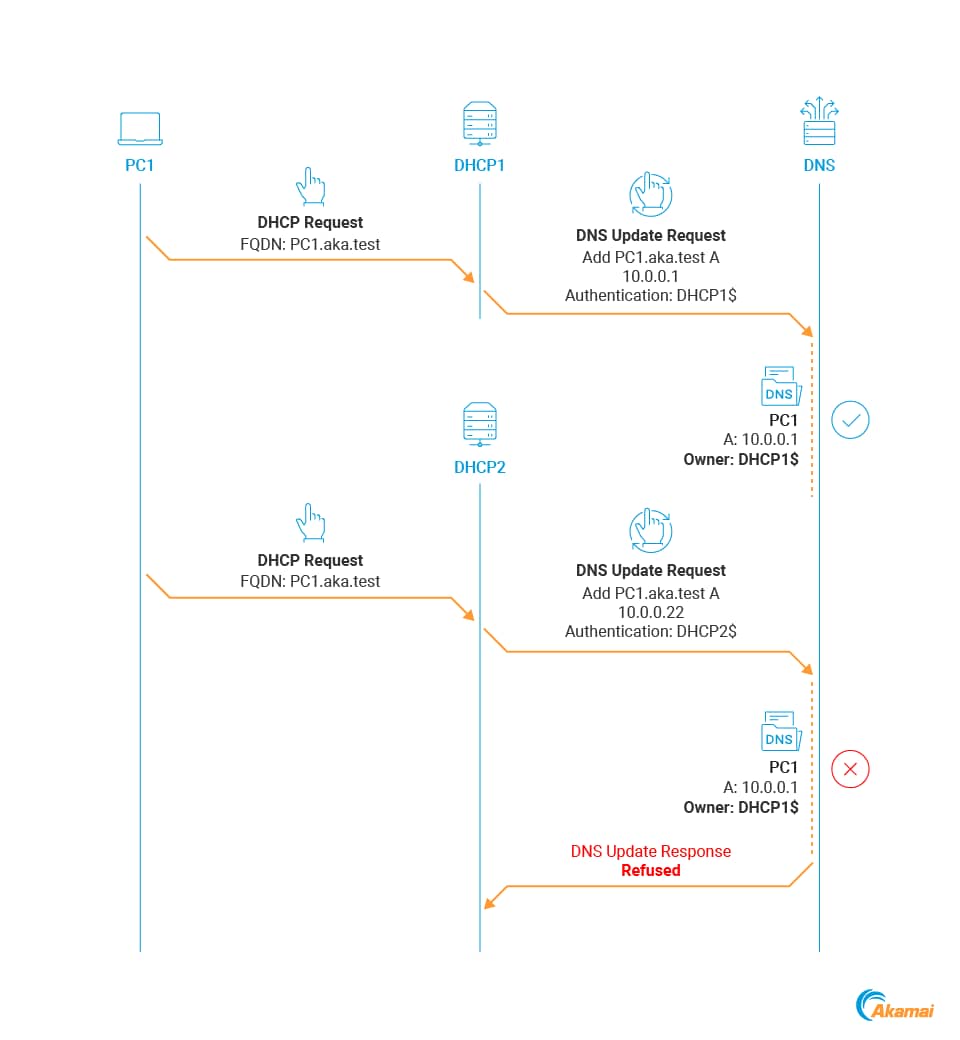 Fig. 30: An example of a multiple DHCP server setup
This problem can again be solved by using DNSUpdateProxy, because of an additional feature of this group. If a member of DNSUpdateProxy tries to modify a record that’s owned by another member, the update is successful because of the ACL, but this time the ACL and ownership don’t change. This allows multiple servers to “co-own” records.
A security risk and a bug
By now you probably understand that the DNSUpdateProxy group exposes a security risk: Any record that was created by members of this group could be “stolen” by any authenticated user. This is not a vulnerability, it's just an abuse of the feature’s design. This risk is acknowledged by Microsoft.
In addition to this risk, we identified another problem that stems from what seems to be a bug in the DNSUpdateProxy feature implementation. When a member of the group creates its own DNS record, it's created with the same vulnerable ACL, for which authenticated users have write permissions.
Figure 31 shows an example. Our DHCP server dhcp1.aka.test record initially has a secure ACL.
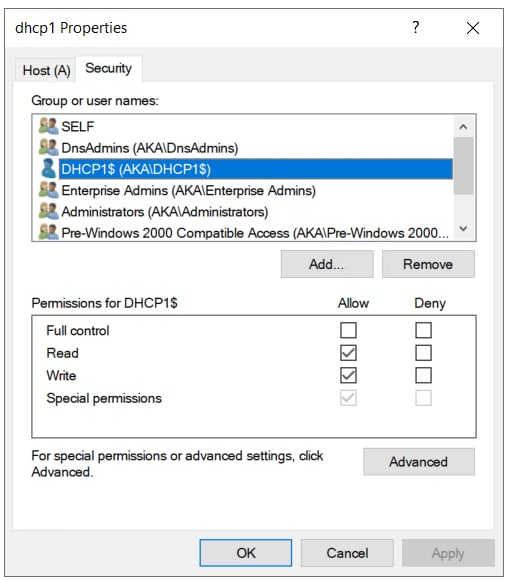 Fig. 31: DHCP server initial ACL
We can see that the machine account has permissions over it, and the Authenticated Users group is nowhere to be found. Now, we add the server to the DNSUpdateProxy group and trigger a recreation of the DNS record. This can happen for several reasons; for example, if the server name is changed. After the DNS record is recreated, we inspect its new ACL (Figure 32).
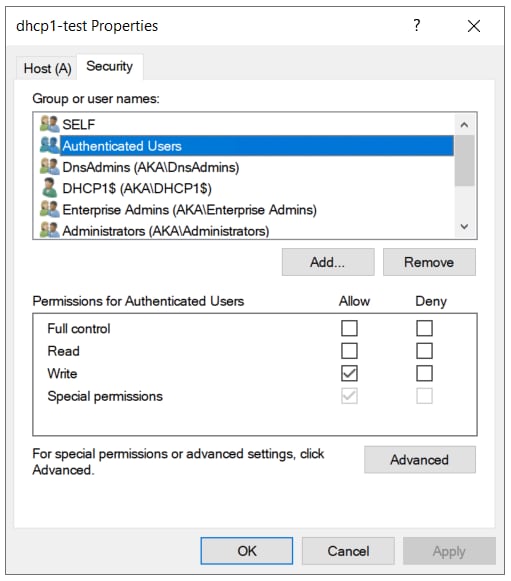 Fig. 32: DHCP server vulnerable ACL
We see that the new DNS record is now writable by domain users. This is obviously not an intended part of the feature — managed records created by the server are meant to have a modified ACL, but the server’s own client record shouldn’t be affected.
Mitigating DHCP DNS attacks
There are many risks relating to DHCP DNS Dynamic Updates. Let's summarize all the different possible server configurations and learn how to mitigate the attacks we just described.
We will refer to the two types of records — managed records that were created by the DHCP server, and client records that were created by Windows clients directly.
The TL;DR version is:
Disable DHCP DNS Dynamic Updates if you don't need them
Client records should be safe if you configure a weak user as the DNS credential
Managed records can’t be protected from spoofing with any configuration; use static DNS records for sensitive non-Windows hosts, if possible
Do not use DNSUpdateProxy; use the same DNS credential across all your DHCP servers instead
DNS credential
This is the best way to mitigate DHCP DNS overwrites on client records. Configure a weak user with a strong password that is dedicated for this purpose. If you run a DHCP server on your DC, this is critical. This setting is not going to stop DHCP DNS overwrites on managed records.
Name Protection
Name Protection should in theory protect managed records, but in practice attackers can bypass it pretty easily. It should still be enabled to make overwrites less trivial.
Although Name Protection is not meant to protect client records, if it's enabled on all the scopes on the server, overwrite attacks would still be mitigated.
When configuring Name Protection on Microsoft DHCP, there are two ways to apply it: at the server level or at the scope level. One might think that Name Protection being enabled on the server level would mean that Name protection would be enabled on the server level, right? Well, that's not actually the case. Enabling Name Protection on the server level only makes sure that new scopes on the server are created with the setting enabled, but it doesn’t enable it on existing scopes. It's important to verify that Name Protection is enabled on the scope level of each of the scopes on the server.
DNSUpdateProxy
You should not use this group. It's a security risk because all the records created by its members are susceptible to overwrites.
If you have multiple DHCP servers and you want them to work together you should use DNS credential instead. Simply configure the same DNS credential on all the DHCP servers — this will allow them to edit one another's records.
DNSUpdateProxy is only useful if you have Windows NT 4.0 clients (or older) that you plan to upgrade soon. And if you have anything of that vintage, you've got bigger problems than DNSUpdateProxy.
If, for some reason, you are required to use DNSUpdateProxy, it’s recommended that you create a static DNS record for each of the group members. A static record would be owned by its creating account, which should be different from the different servers' machine accounts. This will prevent servers from creating their own records with insecure permissions.
DHCP DNS spoofing
There is no way to stop unauthenticated attackers from creating nonexisting DNS records. The only way to do this would be to disable DHCP DNS Dynamic Updates on all DHCP servers. In general, if the DHCP DNS Dynamic Updates feature is not required in your environment, disabling them is probably a good idea. This will eliminate some risks and will help reduce the attack surface.
Detecting misconfigurations with Invoke-DHCPCheckup
To help you traverse the mess of possible DHCP configurations, we are releasing a PowerShell tool called Invoke-DHCPCheckup to identify risks related to DHCP DNS Dynamic Updates (Figure 33).
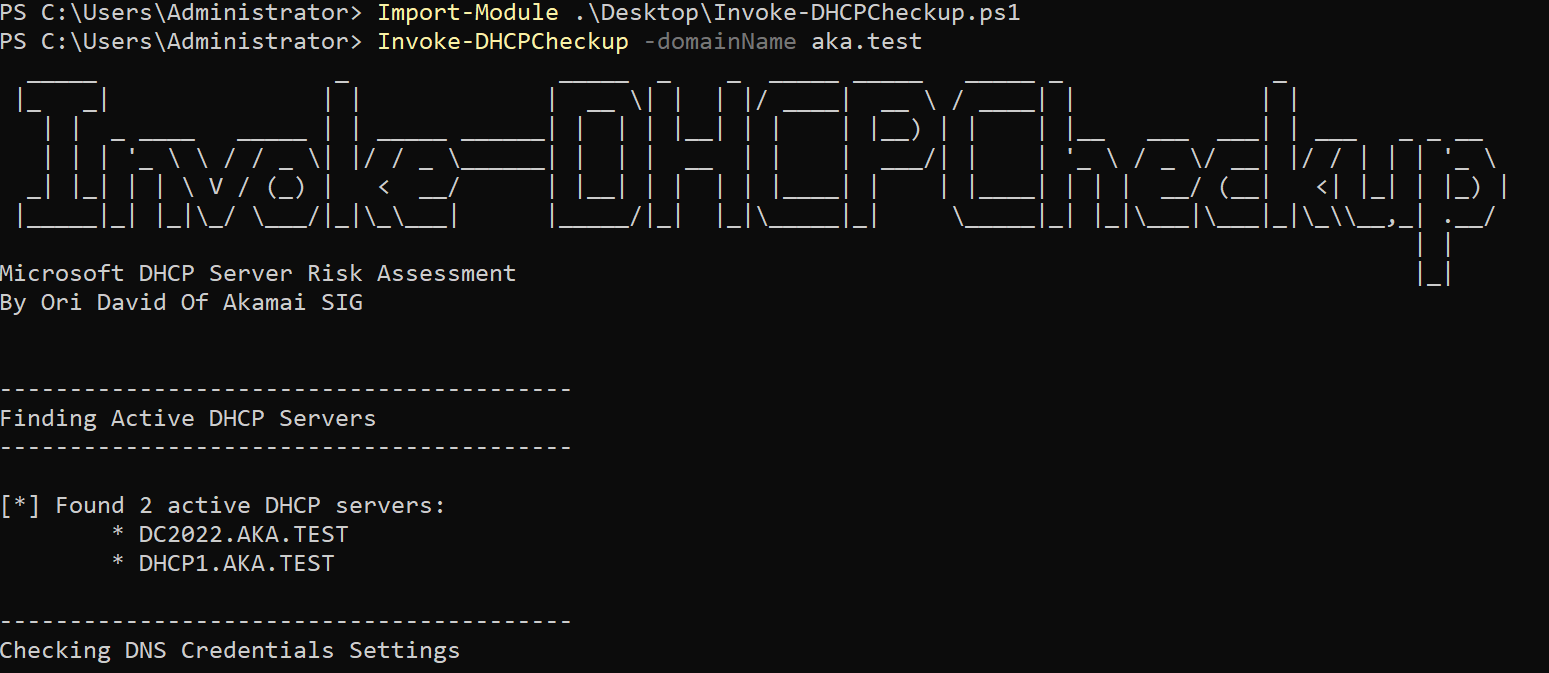 Fig. 33: Invoke-DHCPCheckup example output
The tool identifies the following misconfigurations:
DNS credential
DNS credential is not configured
The configured DNS credential is of a strong user
Name Protection
Name Protection is not enabled on a scope
Name Protection is not enabled by default on new scopes
DNSUpdateProxy
Display group members
Specify whether the members are DHCP servers
Weak record ACLs
List records owned by DHCP servers (managed records)
List records that could be overwritten by authenticated users
This tool relies on DHCP server management API and requires a strong user to run, therefore the tool is mainly meant for blue teams.
Summary
We reported all our findings to Microsoft, which responded that all the above-mentioned problems are either by design, or not severe enough to receive a fix.
We tend to disagree. The impact of the attacks that we highlighted can be very significant — the ability to overwrite DNS records without any authentication enables attackers to gain a machine-in-the-middle position on hosts in the domain. This could easily expose sensitive information and credentials, and could also enable relay attacks, allowing attackers to breach AD domains and escalate privileges. The statistics we shared in this post demonstrate how solid the threat is for many data center networks.
Since a fix for these problems is not planned, we urge defenders to scan their environments using Invoke-DHCPCheckup to try to locate the risky misconfigurations that we’ve highlighted. Spoiler alert — if you didn’t change the default configuration, you are vulnerable.
Stay tuned
In an upcoming blog post, we will release DDSpoof (DHCP DNS Spoof) — a tool that implements all the attacks that we described in this article. We will show how unauthenticated attackers can collect necessary data from DHCP servers, identify vulnerable DNS records, overwrite them, and use that ability to compromise AD domains.